Habitat-Sim is a fast 3D simulator for embodied AI. You drop an agent into a photorealistic indoor scene and collect RGB, depth, semantic, and pose data as it moves around. It's the backbone of a lot of navigation and rearrangement research.
Getting it running, though, is a different story, especially on a machine you don't fully control, like Google Colab. I set out to do something simple: have an agent walk randomly through one scene and save an RGB image, a depth image, and the camera pose at every step. What should have been a 20-minute job turned into a debugging tour through conda environments, Python version conflicts, and the single most cryptic GPU error I've seen in a while.
This post walks through the whole thing: the working setup, and (more usefully) every error I hit and what actually fixed it. If you landed here from a search engine after pasting an error message, skip to the section that matches it.
What "headless" means (and what you'll actually see)
First, a conceptual point that confused me early. Colab has no monitor, so Habitat runs in headless mode using EGL rendering. "Headless" does not mean you get no visuals. It means there's no live pop-up window. Instead, Habitat renders each frame into a NumPy array. You save those arrays as images or stitch them into a video and view them afterward. The visual content is identical to a windowed run; you just look at it after the fact rather than watching live.
One more expectation to set: a bare habitat-sim agent is an invisible first-person camera. You see through its eyes, not a third-person view of a robot or humanoid. The humanoid avatars from the Habitat 3.0 paper are a separate, heavier setup (habitat-lab plus license-gated assets), not something the base simulator shows automatically.
The environment problem, and why it drives everything
Almost every error below traces back to one root fact: the prebuilt habitat-sim conda package is compiled for Python 3.9, but Colab's notebook kernel runs a much newer Python (3.12 at the time of writing). These two cannot be reconciled in the same interpreter. Once you internalize that, the whole install strategy makes sense: habitat-sim has to live in its own isolated 3.9 environment, and the notebook talks to it from the outside.
Step 1: Install conda on Colab
Colab doesn't ship conda, so install a lightweight version first. This restarts the runtime automatically, which is expected, just wait for it.
!pip install -q condacolab
import condacolab
condacolab.install()
After the restart, confirm it's alive:
import condacolab
condacolab.check()   # should say "everything is A-OK!"
Step 2: Create an isolated Python 3.9 environment
This is the crux. Do not try to install habitat-sim into the base environment, or you'll hit a version wall (see Error 1 below). Instead, create a dedicated 3.9 environment and install into it:
!conda create -y -n hab python=3.9
!conda install -y -n hab -c conda-forge -c aihabitat habitat-sim=0.3.1 headless withbullet
headless gives you EGL rendering (no display needed); withbullet adds the physics engine.
The rule that saves you a dozen errors
habitat-sim now lives in the hab environment, which the notebook kernel cannot see. So there's one rule that governs everything from here:
Anything that touches habitat-sim must run through
conda run -n hab. Anything that only views results (matplotlib, PIL, imageio) runs in a normal cell.
Break this rule and you get ModuleNotFoundError: No module named 'habitat_sim', not because anything is broken, but because you ran it in the wrong Python.
Verify the install actually works:
!conda run -n hab python -c "import habitat_sim; print('OK', habitat_sim.__version__)"If that prints a version, the install succeeded.
Step 3: Download a test scene
The smallest scene to start with is the built-in test set. Note the conda run -n hab prefix, since this touches habitat-sim:
!conda run -n hab python -m habitat_sim.utils.datasets_download --uids habitat_test_scenes --data-path /content/dataStep 4: The random-walk script
Because habitat-sim lives in the isolated environment, you don't run this as notebook cells. You write it to a file with %%writefile (which only saves, it does not execute), then run that file through conda run.
Note the two environment-variable lines at the very top. Those are the GPU fix, explained in Error 4 below. They must come before import habitat_sim.
%%writefile /content/random_walk.py
import os
os.environ["__EGL_VENDOR_LIBRARY_FILENAMES"] = "/content/egl_vendor/10_nvidia.json"
os.environ.pop("CUDA_VISIBLE_DEVICES", None)

import numpy as np
import csv
import habitat_sim
from PIL import Image

sim_settings = {
    "scene": "/content/data/scene_datasets/habitat-test-scenes/skokloster-castle.glb",
    "sensor_height": 1.5,
    "width": 256,
    "height": 256,
}
N_STEPS = 50

def make_cfg(settings):
    sim_cfg = habitat_sim.SimulatorConfiguration()
    sim_cfg.scene_id = settings["scene"]
    sim_cfg.enable_physics = False
    sim_cfg.gpu_device_id = 0

    rgb_sensor = habitat_sim.CameraSensorSpec()
    rgb_sensor.uuid = "color"
    rgb_sensor.sensor_type = habitat_sim.SensorType.COLOR
    rgb_sensor.resolution = [settings["height"], settings["width"]]
    rgb_sensor.position = [0.0, settings["sensor_height"], 0.0]

    depth_sensor = habitat_sim.CameraSensorSpec()
    depth_sensor.uuid = "depth"
    depth_sensor.sensor_type = habitat_sim.SensorType.DEPTH
    depth_sensor.resolution = [settings["height"], settings["width"]]
    depth_sensor.position = [0.0, settings["sensor_height"], 0.0]

    agent_cfg = habitat_sim.agent.AgentConfiguration()
    agent_cfg.sensor_specifications = [rgb_sensor, depth_sensor]
    agent_cfg.action_space = {
        "move_forward": habitat_sim.agent.ActionSpec(
            "move_forward", habitat_sim.agent.ActuationSpec(amount=0.25)),
        "turn_left": habitat_sim.agent.ActionSpec(
            "turn_left", habitat_sim.agent.ActuationSpec(amount=30.0)),
        "turn_right": habitat_sim.agent.ActionSpec(
            "turn_right", habitat_sim.agent.ActuationSpec(amount=30.0)),
    }
    return habitat_sim.Configuration(sim_cfg, [agent_cfg])

cfg = make_cfg(sim_settings)
sim = habitat_sim.Simulator(cfg)

os.makedirs("/content/output/rgb", exist_ok=True)
os.makedirs("/content/output/depth", exist_ok=True)
poses = []

actions = list(cfg.agents[0].action_space.keys())
agent = sim.get_agent(0)

for step in range(N_STEPS):
    action = np.random.choice(actions)
    observations = sim.step(action)

    rgb = observations["color"]      # (H, W, 4) uint8
    depth = observations["depth"]    # (H, W) float32, in meters

    Image.fromarray(rgb[:, :, :3]).save(f"/content/output/rgb/{step:04d}.png")
    np.save(f"/content/output/depth/{step:04d}.npy", depth)

    state = agent.get_state()
    pos = state.position
    rot = state.rotation
    poses.append({
        "step": step, "action": action,
        "x": float(pos[0]), "y": float(pos[1]), "z": float(pos[2]),
        "qx": float(rot.x), "qy": float(rot.y),
        "qz": float(rot.z), "qw": float(rot.w),
    })

with open("/content/output/poses.csv", "w", newline="") as f:
    writer = csv.DictWriter(f, fieldnames=poses[0].keys())
    writer.writeheader()
    writer.writerows(poses)

sim.close()
print("Done. Saved", N_STEPS, "steps to /content/output")
A couple of design notes on the script. Depth is saved as .npy rather than PNG because depth values are real distances in meters (floats); a PNG would clip and round them. The camera pose comes from agent.get_state(), which gives .position (xyz world coordinates) and .rotation (a quaternion), saved as flat columns in a CSV.
Step 5: Run it
!conda run -n hab python /content/random_walk.pySuccess looks like Done. Saved 50 steps to /content/output.
Step 6: View the results (plain cells, no conda run)
import matplotlib.pyplot as plt
import numpy as np
from PIL import Image

rgb = Image.open("/content/output/rgb/0000.png")
depth = np.load("/content/output/depth/0000.npy")

fig, ax = plt.subplots(1, 2, figsize=(10, 4))
ax[0].imshow(rgb);                   ax[0].set_title("RGB");       ax[0].axis("off")
ax[1].imshow(depth, cmap="viridis"); ax[1].set_title("Depth (m)"); ax[1].axis("off")
plt.show()
Here's what that produces: a single frame from the agent's view inside the test castle scene:
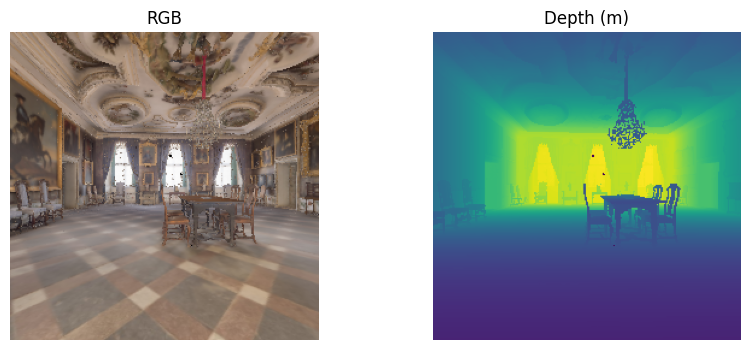
On the left is the RGB image, the ornate interior exactly as the agent's camera sees it. On the right is the depth map for the same frame, colored by distance: darker (purple) is closer to the camera, brighter (yellow) is farther away. Notice how the floor fades from dark in the foreground to bright toward the back wall, and how the chandelier and table legs stand out at their true distances. This depth image isn't just for looking at. The underlying .npy holds the real distance in meters for every pixel, which is the data you'd actually use downstream.
And stitch the walk into a playable video:
import imageio.v2 as imageio
import glob
from IPython.display import Video

frames = sorted(glob.glob("/content/output/rgb/*.png"))
images = [imageio.imread(f) for f in frames]
imageio.mimsave("/content/output/walk.mp4", images, fps=10)

Video("/content/output/walk.mp4", embed=True, width=400)
The error gallery
Here's the part you probably came for. These are the errors I actually hit, in order, with what each one really meant and what fixed it.
Error 1: python_abi 3.9 ... conflicts with ... cp312
LibMambaUnsatisfiableError: Encountered problems while solving:
  - package habitat-sim ... requires python_abi 3.9.* *_cp39, but none of the providers can be installed
What it means: you tried to install habitat-sim into an environment running Python 3.12. The package only exists for Python 3.9. The solver literally cannot satisfy this.
The fix: don't install into the base environment. Create a dedicated 3.9 environment (Step 2) and install into that. This is the single most important structural decision in the whole setup.
Error 2: ModuleNotFoundError: No module named 'habitat_sim'
This one is sneaky because it shows up after a successful install, which makes it feel like something regressed.
What it means: you ran import habitat_sim in a normal notebook cell. The kernel is Python 3.12; habitat-sim lives in the 3.9 hab environment. The kernel genuinely cannot see it. Nothing is broken.
The fix: anything touching habitat-sim runs through conda run -n hab. If you're writing a script, put the code in a %%writefile cell (which only saves the file) and execute it with !conda run -n hab python /content/your_script.py. A telltale sign you hit this: the traceback path contains /tmp/ipykernel_..., meaning the code ran in the kernel instead of the environment.
Error 3: condacolab.install() got an unexpected keyword argument 'python_version'
What it means: some builds of condacolab don't accept a python_version= argument. It's a version-of-condacolab mismatch, not your fault.
The fix: skip that argument entirely. Install condacolab plainly, then create the 3.9 environment separately with conda create -n hab python=3.9. Isolating the version in a named environment is more robust than trying to pin the base environment anyway.
Error 4, the big one: unable to find CUDA device 0 among 1 EGL devices
Platform::WindowlessEglApplication::tryCreateContext():
    unable to find CUDA device 0 among 1 EGL devices in total
WindowlessContext: Unable to create windowless context
This is the error that cost me the most time, and the fixes you'll find first (setting gpu_device_id, exporting EGL_DEVICE_ID, recreating the runtime) mostly don't work for the real underlying cause. Here's how to actually diagnose it.
First, rule out the obvious. Confirm you actually have a GPU attached (Runtime → Change runtime type → T4 GPU):
!nvidia-smiIf there's no GPU, that's your problem, so attach one and redo the setup. But if nvidia-smi shows a T4 and you still get the error, read on, because the cause is subtler.
Check whether habitat is even loading the right EGL library:
!conda run -n hab bash -c 'ldd $(python -c "import habitat_sim; print(habitat_sim._ext.habitat_sim_bindings.__file__)") | grep -i gl'There's a well-known fix (widely shared for headless servers) that says habitat ships its own incompatible EGL libraries and you must disable them. On some servers that's true. On Colab, it wasn't. My output already showed the libraries resolving to the system NVIDIA path (/usr/lib64-nvidia/...). So that fix didn't apply. Don't blindly rename libraries; check first.
The actual root cause on Colab: inspect the EGL vendor loader:
!ls -la /usr/share/glvnd/egl_vendor.d/
!cat /usr/share/glvnd/egl_vendor.d/*.json
What this directory is. /usr/share/glvnd/egl_vendor.d/ is EGL's list of "graphics drivers I'm allowed to use." Each .json file inside is one entry pointing at one driver library. When Habitat asks EGL "give me a GPU to render on," EGL reads every file in this folder to discover what renderers exist. You don't create these files; they ship with the system image.
In my case this directory contained only one file, 50_mesa.json, which was already there as part of Colab's image. It points at the Mesa software (CPU) renderer. Crucially, there was no NVIDIA entry at all, even though the NVIDIA GPU driver library was sitting on disk in /usr/lib64-nvidia/. Colab's image simply never registered the NVIDIA driver in this directory.
So here's the actual cause, stated plainly: EGL wasn't failing because the GPU was broken or unreadable. It was failing because nothing in that directory told EGL the NVIDIA driver existed. EGL read the one file it had, found only Mesa's software renderer, and reported "no CUDA device." The GPU was physically present the whole time; EGL was just never pointed at it.
The fix: add a second entry to that list, an NVIDIA vendor JSON pointing at the NVIDIA EGL library that already exists on disk, then tell EGL to use it.
import json, os

os.makedirs("/content/egl_vendor", exist_ok=True)
vendor = {
    "file_format_version": "1.0.0",
    "ICD": {
        "library_path": "/usr/lib64-nvidia/libEGL_nvidia.so.0"
    }
}
with open("/content/egl_vendor/10_nvidia.json", "w") as f:
    json.dump(vendor, f, indent=4)
Why the filename starts with 10_. EGL reads the driver entries in numeric/alphabetical order and uses the first one that works. The existing Mesa file is 50_mesa.json. By naming ours 10_nvidia.json, it sorts before 50, so EGL tries NVIDIA first, succeeds, and gives you the GPU. If you named it something like 99_nvidia.json, Mesa (at 50) would be tried first and you could end up back on the software renderer. The leading number is simply a priority, where lower means "try this earlier." (This numeric-prefix convention is standard across many Linux config directories; it isn't specific to Habitat.)
Then, in your script, point EGL at your new file with the __EGL_VENDOR_LIBRARY_FILENAMES environment variable. This variable overrides the directory scan and says "use exactly this vendor file." It must be set before import habitat_sim, because EGL initializes as Habitat loads. Set it afterward and it's too late. This is why those two lines sit at the very top of the %%writefile script above:
os.environ["__EGL_VENDOR_LIBRARY_FILENAMES"] = "/content/egl_vendor/10_nvidia.json"
os.environ.pop("CUDA_VISIBLE_DEVICES", None)
After this, EGL finds the NVIDIA driver, enumerates the actual GPU as a CUDA device, and Habitat renders. The confirmation is right at the top of a successful run: a banner reading something like T4/PCIe/SSE2 by NVIDIA Corporation, OpenGL version: 4.6.0 NVIDIA 580.82.07. That means EGL found your T4 through the real NVIDIA driver.
Note: the exact library paths (
/usr/lib64-nvidia/, the driver version number) can differ across Colab images. Always list the directory first to confirm the real path before writing the JSON, rather than copying mine verbatim.
A harmless "error" you can ignore
After a successful run you may see red warning text about a missing semantic scene:
SemanticScene.cpp ... SSD Load Failure! File ... skokloster-castle.scn ... failed to load.This is harmless. Semantic annotations are an optional fourth sensor type (per-pixel object labels). The small test scene doesn't ship them, and since your script only requested RGB and depth, it doesn't matter. Your data was already captured before these warnings printed.
What you end up with
In /content/output you'll have 50 RGB frames, 50 depth arrays with true metric values, and a poses.csv containing camera position and orientation for every step. Download the whole thing with:
from google.colab import files
!zip -r /content/output.zip /content/output
files.download("/content/output.zip")
Lessons learned
If I had to compress this whole ordeal into a few takeaways:
The Python version mismatch is the source of most confusion. habitat-sim is a 3.9 package living in an isolated environment; the notebook kernel is a newer Python that can't see it. Once you accept the conda run -n hab discipline, the ModuleNotFoundError mystery disappears.
The CUDA/EGL error is almost never about the GPU device ID. On Colab specifically, it's about a missing NVIDIA entry in the EGL vendor loader. Diagnose by inspecting /usr/share/glvnd/egl_vendor.d/ before trying random device-id tweaks.
Diagnose before applying popular fixes. The widely-shared "disable habitat's bundled EGL" fix is correct for some servers and wrong for Colab. A single ldd check tells you which situation you're in and saves you from breaking a working setup.
Headless doesn't mean blind. You still get the full rendered scene; you just view it as saved frames or a stitched video instead of a live window.
With the renderer working, the natural next steps are constraining the walk to valid floor space using the navmesh, swapping in a larger furnished scene, or moving up to habitat-lab for the humanoid and human-robot collaboration tasks. But the hard part, getting GPU rendering alive on Colab, is behind you.